Showing posts with label cmd. Show all posts

Jun 10, 2016

How to Hide A Drive Using Command Prompt in Windows 10/8/7


Greetings from Tutorial Nutshell. Ever wanted to conceal a drive; maybe because you have private stuff that you wouldn’t want anyone to find, or to know it exists in some drive in your computer? Well, this tutorial is for you. We will use Command Prompt in Windows to hide/ unhide a drive. Just follow these steps:  Note: we will be using attached cmd screenshot for examples. Use relevant volume numbers and drive letters for your computer.

Diskpart command line utility
1. Open your command prompt (start – type cmd in the search box, and hit Enter
2. Type diskpart and hit enter. (Select yes if UAC interface pops up; but it would be great if you can run cmd in elevated mode (run it as administrator) Then the diskpart command line utility will appear. Note: Diskpart  is used to manage and maintain partition drives.
3. Now issue the list volume command. This will display all the drives in your computer
4. Then issue the select volume 3 command. (Note: 3 is the volume number of the drive to be hidden. I used 3 in order to select E: drive in my computer as shown in the screenshot of my command prompt on the above. You can choose any other drive you want!)
5. To hide drive 3, issue the command remove letter E:

Type exit to quit diskpart. Finally go to my computer and your just hidden drive will be invisible. If all steps executed successfully but no results showing at my computer,   To make that hidden drive visible again follow the same steps (Step 1 through 4) but instead of the remove letter E: command in step 5, issue the assign letter E: command. Note that when the drive letter is hidden (removed), it will not show under the Ltr column of the corresponding Volume ### column in the cmd.


That’s it…Enjoy!!!


Read more >>>

Jun 8, 2016

How to Eliminate Shortcut Virus from your Pendrive / Flashdrive / Portabledrive and reclaim your hidden files

Hello guys… So picture this: You have a Pendrive / Flashdrive / Portabledrive with important files in it. You get to your friend’s house to show them the cool stuff you got. After inserting it in your friends’ PC...it shows all your files as shortcuts. You then scan the pendrive with the updated Antivirus software but then it doesn’t show/bring back your files. Well that’s a ‘horror movie’ but I’m NOT a movie script writer, hahaha! So this tutorial will show you the simplest, most effective way of addressing such a ‘horror’.

Just copy and paste the following code to notepad and save it as "ShortcutRemover.bat" (…you can choose any other name you want, but remember to save it in the .bat format) and save it to the infected stick and run it. Follow instructions until all the processes are complete. That’s it. Enjoy…

CODE:
Echo off
cls
echo Created by Tutorial Nutshell - www.tutorialnutshell.blogspot.com
echo.
Echo Eliminate Shortcut Virus from your Pendrive / Flashdrive / Portabledrive 
Echo and reclaim your hidden files
echo.
)
pause
cls
echo.
echo please wait for all process to complete…
echo.
echo 1 Minute To Complete, please Wait!
echo.
echo Repair Folder
echo.
attrib -s -h %1*.* /s /d
echo.
echo Delete drivesgideinfo Folder
echo.
rmdir /s /q drivesguideinfo
echo.
rmdir /s /q h3ojKiH9lvFefFO0mG6HlXplgLV3LYYuVHdaRr3dtLhEN80DniEPQXQY2sziakx2axTnS4SA044lSPkbMnv9Qm
echo.
echo Delete Shortcut Folder
echo.
del /a /s %scut%\*.lnk
cls
echo.
echo Process Complete
echo.
echo.
echo For more tutorials like this: www.tutorialnutshell.blogspot.com
echo.
)
pause

PS: Delete the files created by the virus especially the autorun.inf file. That all but remember do not run the 'ShortcutRemover.bat' in your system or desktop.


Read more >>>

Aug 20, 2012

Creating a USB Installation Source of Windows 7 or Windows 8 OS

Hi, and welcome to my first ever tutorial blog-post. In this tutorial I will be demonstrating to you on how you can prepare a USB flash drive to use as a Windows 7 or Windows 8 installation source without using any third party software (i.e. using the windows operating system’s command prompt (CMD) only). The operating system used for this tutorial is Windows 7- Ultimate.

Prerequisites: a USB storage device (at least 4GB of free space), a computer running Windows 7 or Windows Vista, A windows 7 or Windows 8 installation DVD.

Note: Your USB drive will be completely wiped out- so make sure you don’t have any important stuff in it before this process. Backup your USB contents. Also you can use a windows 7 or Windows 8 ISO file mounted to a virtual drive instead of a windows 7 or Windows 8 installation DVD to perform the same process. The process requires that you run the command prompt (cmd) as administrator- to achieve this, right click on the command prompt found at: start > all programs > accessories > command prompt; and select yes when the user account control (UAC) appears.

Process:
1. Insert the Windows 7 or Windows 8 installation DVD to the DVD drive and connect the USB storage device to the computer
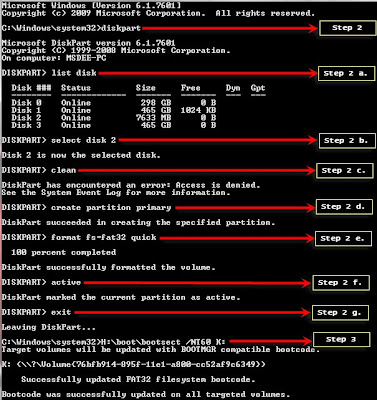
2. Open an elevated command prompt and type diskpart which is used to manage and maintain partition drives. Then press enter. In the diskpart command line utility that appears, issue the following commands:

a. list disk (this will help you identify which of the disks connected to the computer represents the USB flash drive)
b. select disk disknumber (where disknumber is the the number of the disk that you have identified as the USB flash drive that you want to operate on)
c. clean (Note: This will remove the existing partition formatting and data from the USB flash drive.)
d. create partition primary ( creates a partition of type primary)
e. format fs=fat32 quick (quick-formats the created partition and changes its file system to fat32)
f. active (makes the actual partition an active partition)
g. exit (quits diskpart)

diskpart and bootsect operations
Image depicting the process...
3. Now we need to execute the bootsect command to update the volume with the BOOTMGR boot loader program to make the USB drive bootable. To perform this you need to specify the path to your windows 7 or Windows 8 installation DVD; and navigate to the folder called boot which contains a program called bootsect. We will then run this program with the /nt60 (/nt60 applies the master boot code that is compatible with BOOTMGR to the ) parameter, specifying the USBdriveLetter that our USD is connected to. This will copy the boot manager files to our USB drive: 

<Path> /boot/bootsect.exe /nt60 <USBdriveLetter:> 

4. Now copy all the files located on the Windows 7 or Windows 8 installation DVD to the USB flash drive. You are done. Your USB device is now bootable and you can now use it as an installation source as if you are running a regular installation DVD. Just make sure your BIOS setting are set to “boot from USB device” so that once your computer boots, it can boot from it.
Read more >>>